PART 5 – COMMANDERS
(1) Bolster the BG they are with in the Joint Action Phase to try to recover lost cohesion. I view this as the most important because recovering cohesion is something only Commanders can do.
(2) Raise troop morale within their range by adding to Cohesion Test rolls (if a BG is in close combat they need to be with it to affect it). You saw above how important a +1 or more on the dice can be.
(3) Help restrain shock troops and improve manoeuvre by a Complex Move Test bonus and by personally leading Undrilled troops to let them perform “difficult moves†near the enemy without needing a CMT.
(4) Fight in the front rank of a BG to improve its quality for close combat rerolls. The problem is that they have no effect on any other BGs when in the front rank, they get out of the front rank only after the BG is out of combat, and they can be killed in action. The bigger the BG, the more bases get the reroll benefit.
502. The relative importance of these roles depends on the army and circumstances. For example, Pikemen and Spearmen depend on being Steady for their best combat POAs, so bolstering them from Disrupted to Steady is an important priority. BGs in close combat can only be affected by Commanders with them, so Commanders offer a broader radius of morale benefit for Skirmishers and missile troops than those engaged in close combat. Good quality and well-equipped troops, and those unlikely to engage in close combat or be shot at, need Commanders less.
503. Keep Commanders moving when they can improve your position, such as moving to Undrilled troops who might face a difficult move next turn so that they don’t need to take a CMT for it, or joining troops facing imminent combat to help sustain them in a Cohesion Test if they lose, but staying out of the front rank in order to still exert influence over other BGs.
CHOOSING COMMANDERS
510. Number of Commanders: Fancy manoeuvring, the need to redeploy troops, or heavy incoming shooting each increase the need for Commanders. The consensus is that 800 points requires 4 commanders but many armies are fine with 3 at 600 points. Taking 2 is unusual and risky, but might work for an army with few BGs and no movement or morale problems. Apart from fighting in the front rank, as a rule of thumb Skirmisher, Superior, and Drilled troops need commanders less, while lower quality and Undrilled troops need them more. Commanders, and particularly an IC, are also more important when facing heavy shooting that is not mitigated by armour.
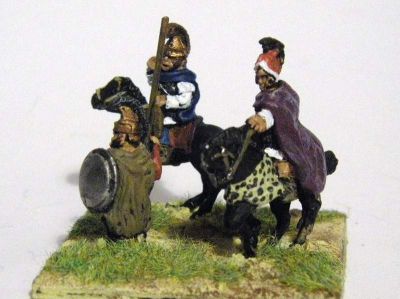
511. Troop Commander (TC): Cheapest, they are the workhorse front-line leaders bolstering troops and for front-rank combat while someone else is looking after CMT/CT bonuses. Their weakness is their limited 4 MU radius, so they can often only cover 3 BGs in a battle line and do a poor job of covering dispersed BGs such as lights. Have plans for each TC – plan ahead the use of powerful TC/Big BG close combat formations.
512. Field Commander (FC): 8 MU radius and +1 flank march arrival bonus make them good sub-Commanders for flank marches, brigades of several BGs working in concert, and as part of doctrine and tactics for some armies. They also provide +1 Pre-Battle Initiative if the CinC. In some circumstances a FC can do the work of two TCs for CT and CMT purposes, but for exercising a broad influence an IC is more effective and if you have an IC then TCs can be dedicated to bolstering and front-rank combat purposes. Note that a TC C-in-C can have FC sub-Commanders (e.g., for a flank march). In practice, FCs are not very popular in 800 point lists.
513. Inspired Commander (IC): The +2 Pre-Battle Initiative bonus can be valuable in giving you the advantage in deployment (although the other player gets first move). A radius of 12 MU is enough to cover most of a compact army and additional +1 bonus to CTs and CMTs makes a big difference. ICs are good at covering a long battle line, a dispersed wing, Undrilled troop CMTs, and supporting the morale of troops facing heavy shooting, as well as keeping shock troops under control and coordinated. Their bonus makes them very good at bolstering BGs or rallying routers. Because of their value, they are generally kept out of the front rank.
The impact of an IC is reduced by ally contingents and once lines of battle are in close combat, similarly for Drilled or armoured troops (tougher against both shooting and close combat), Skirmishers, or shooters without CMT issues or who don’t need to worry about enemy shooting back.
514. Commanders and FLANK MARCHES: (also see Tip 750) Flank marching has proved to be uncommon in singles games, although it has obvious advantages in a more crowded doubles battlefield. It can be useful to turn an opponent’s flank in suitable terrain or to bring an extremely large army to bear. Using a FC increases the chance of arrival per turn from 6/36 to 10/36 and will be better to handle moderately dispersed flank marchers.
520. ALLY COMMANDERS AND CONTINGENTS: The one compelling reason for an Ally Commander is that his contingent is the only way to provide complementary troops important to the army’s doctrine and battle plans. Ally commanders are also used for wings or flank marchers – why not save 10 points for troops that are going to operate independently anyway? But otherwise saving 10 points may not be worth the problems of having 2 separate chains of command, and once an allied commander dies, his contingent can never recover failing morale.
Examples of common use of allies: German or Gallic tribal sublists forcing a choice between infantry as all HF or all MF – the army can be one tribe, the ally contingent another, providing the versatility of having both HF and MF. Other examples are a foot army seeking mounted, a mounted army seeking terrain troops, a terrain army seeking heavy line of battle troops, an army seeking a Skirmisher contingent for the wings or flank marching, or an army seeking a specific counter-troop such as having Spearmen available against Knights or Lancers. (e.g., Late Republican Romans with Allied Jewish HF or MF Spearmen).
Close combat troops of allied contingents should stick close together to facilitate Commander support. Skirmishers can afford to detach across the battlefield if tactically necessary since they can manage risk and more readily be extricated and rendezvous for bolstering if required. Note that the size of an ally contingent is only limited by points and the ally list, but that an ally contingent of more than 3 BGs is not allowed to flank march. For melee allies, I tend to favor 2 BGs, with one smaller than the other that can provide rear support and an alternative for the Ally Commander if the first is irrecoverable.
Unless there is only one ally BG, putting the Ally Commander in the front rank is risky since if he dies his BGs are unbolsterable, and multiple ally BGs losing cohesion tests triggered on death of their nearby Commander gets ugly.
530. COMMANDERS IN THE FRONT RANK: Commanders fighting in the front rank improve close combat rerolls by one quality level BUT have NO influence beyond the BG they are with. The bigger the BG, the more bases get a reroll bonus – this and the CT bonus disproportionately help Poor fighting troops which tend to have large BGs (although some prefer to throw in the Commander only after Impact when leading Spearmens charged by Impact Foot or Lancers). Note that Commanders suffer a Death Roll when their BG takes 2 close combat hits: their risk of death is 1/36 if they did not lose, 1/12 if they lost. In addition, a Commander with a routing BG, whether he was in the front rank or not, always has a 1/6th death risk from pursuers who maintain contact. Another negative is that Commanders in the front rank are stuck there until the BG is no longer in combat or pursuing. Note that when mounted break-off in the Joint Action Phase this allows the Commander out of the front rank and he can also then do his JA Phase move if desired.
It is worthwhile to risk a TC in a losing fight to delay or prevent disaster, to expedite a winning fight when necessary for timing, or in an important even fight to tip the balance. Often an army is built with the intention of one or more TCs leading particular BGs in front rank combat. Ally Commanders with a single BG, such as my Ottoman’s Serbian ally, always lead from the front.
Part 6. Terrain
Field of Glory Tactical Tips
Created originally by Mike K and posted on the Slitherine FoG Forum, and appearing here with his kind permission. This is a live WIKI version of the document and so you welcome to edit or add to the content on any of these pages.
If you are adding totally new items to the list of tips, or putting an opposing viewpoint forward for one of the existing tips please do so by adding a new section using letters to supplement the original numerical sequence. ie:
(original point)-407. Non-skirmisher horse are usually 4 bases for shooting Cavalry and good Lancers, while other Cavalry and Cataphracts are often preferred as 6s if affordable.
(new addition) -407.a Fielding large numbers of low-grade cavalry in 4's can allow you to greatly increase unit count, and improve your chances of initiating flank attacks in which their lesser quality/armour becomes irrelevant.
You can use colours if you wish but it's not obligatory. If you are clarifying or enhancing one of the existing tips, feel free to edit the existing point.
The "locked" Original FoG Tactical Tips is available through that link.
Full Index:
1. Army Choice
2. General Tips
3. Doctrine and Drill
4. BG Sizes
5. Commanders
6. Terrain
7. Organization
8. Battle Plans
9. Troop Types in FoG
10. Light Horse Stable
11. Tactical Miscellany
12. Visualizing Battles
13. Wisdom from the Experts
